Anvils
- Stone Anvils
- Obtaining Raw Rock
- Welding
- Metal Anvils
- Tiers
- Working Metal
- Forging Bonuses
- Helve Hammer
- Anvil Helper Guide
Introduction
An alternative to casting tools directly (and a requirement for higher tier metals) is to use an Anvil. An anvil is a block which can be used for two different processes: Working and Welding. An anvil can weld double ingots of the metal type needed to create the next tier anvil above it, which will be necessary to work other items from that metal.
Stone Anvil
First, you need to acquire a block of raw igneous rock, that is igneous extrusive (Rhyolite, Basalt, Andesite, or Dacite) or igneous intrusive (Granite, Diorite, Gabbro, Pyroxenite, or Keratophyre). You could find and use an exposed block in the world, or you could extract one from the surrounding rock.
You will also need any kind of hammer. In order to make the anvil, simply ПКМ the exposed top face of a raw rock block with your hammer, and voilà! An anvil will be formed.
Anvils have tiers and the rock anvil is tier 0 - the lowest tier. It is only able to Weld tier I ingots.
Превращение центрального блока сырой породы в наковальню.
Получение сырой породы
In order to obtain a raw rock block without breaking it into smaller rocks, it needs to be extracted. You must mine the blocks on all six sides of a raw rock block. Once it is surrounded by air on all sides it will pop off as an item which can be picked up.
Добыча всех шести сторон куска сырого камня - после завершения центральный блок выпадет в виде предмета.
Welding
Welding is a process through which two items are fused together to create a new item. Welding works the same whether on a Stone Anvil or a Metal Anvil.
First, you must place the two items you want to weld on the anvil by opening the anvil interface and inserting them in the two leftmost slots.
You also need to have at least one Flux in the anvil to aid the welding process. Then, while both items are hot enough to weld (the tooltip will say "Can Weld") you must use any hammer on the anvil or press the weld button on the anvil interface. You will hear a hammering sound and the items will be welded together.
Metal Anvils
Metal anvils are an important tool required for metalworking, as they allow you to work and weld metal ingots into various different forms.
Working is done to form one piece of metal into another, and welding, is used to fuse two metal items into one solid piece.
Все типы металлических наковален.
Anvils can be crafted with Double Ingots of their respective metal. For your first anvil, you must first Weld double ingots on a Stone Anvil. Anvils are very heavy, you can only carry one at a time.
У каждой наковальни есть Уровень, который определяет, с какими типами материалов она может работать и сваривать. Наковальня может обрабатывать металлы своего текущего уровня, и она может сваривать металлы, которые на один уровень выше.
- Уровень 0: Каменные наковальни
- Уровень I: медь
- Уровень II: Висмутовая бронза, Чёрная бронза, Бронза
- Уровень III: Кованое железо
- Уровень IV: Сталь
- Уровень V: Чёрная сталь
- Уровень VI: Красная сталь, Синяя сталь
Working
In order to work an item on the anvil, you will need to ПКМ the anvil, to open up the anvil interface, seen on the next image. On the left, there are two input slots for items - for working, the target item must be in the right-hand slot. You will also need a hammer while working, either in the hammer slot on the right of the anvil or in your main hand. The hammer will gradually take damage as you work the item.
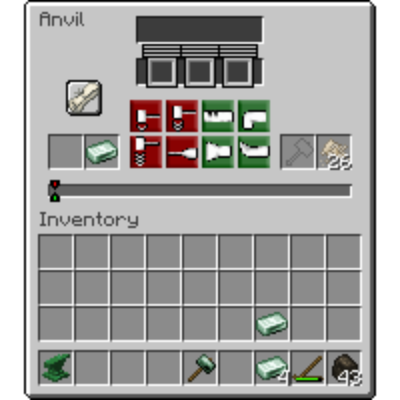
Интерфейс наковальни.
You will then need to select the plan, which chooses which item you want to create. ЛКМ on the scroll button, and then pick one of the items to create. The anvil interface will return, but now you will have selected a plan. The scroll will show the item you are working to create, and the rules and target will now be populated.
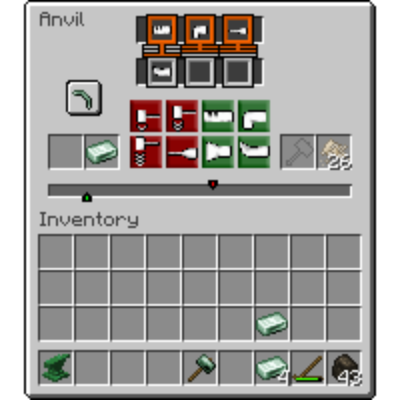
После выбора создания кирки.
Цели
В середине экрана наковальни есть полоса с двумя цветными индикаторами. Зеленый указатель - это ваш текущий прогресс работы. Красный указатель - это цель. Ваша задача - совместить текущий прогресс с целью.
Для этого вы можете использовать зеленые и красные кнопки действий, которые перемещают ваш текущий прогресс на определенное количество, в зависимости от предпринятого действия.
Green actions will always move your target right, and Red actions will always move your progress left. Note that if you move your target off of the progress bar, you will have overworked your item and will lose the ingot. However, while working, you must also match the rules...
Правила обработки
Правила, это два или три значка, показанных в верхней части интерфейса наковальни. Они представляют конкретные действия, которые должны быть выполнены в определенное время, чтобы ваша работа была успешной. Например, правило может быть Согнуть предпоследним, что означает, что предпоследнее действие, которое вы предпринимаете, должно быть действием Сгибания.
Your last three actions are shown right underneath the rules. When a rule is satisfied, its outline will change to green. Success occurs when all rules are satisfied.
Finally, you have to be mindful of your item's temperature. Metals can only be worked when they are above a certain temperature where the tooltip shows "Can Work". You may take an item out and re-heat it during the working process.
Confused? That's ok, it's a lot to take in, but it's actually just a simple bit of addition and subtraction. Check our step-by-step guide on how to use the "anvil helper" resource pack, which makes smithing easy!
Бонусы ковки
Working can be tedious, and take many steps to get correct. However, there is a reward for being efficient. Some items―such as tool heads―when they are worked in a low or minimal amount of steps, receive a Forging Bonus based on how efficiently they were forged. This bonus will then apply to tools that the item is used in, for example, a pickaxe head used to make a pickaxe.
We also have a step-by-step guide on how to perfectly forge anything!
Идеальная ковка
There are four tiers of forging bonus:
- Modestly Forged
- Well Forged
- Expertly Forged
- Perfectly Forged
These bonuses increase the power of your tool - making it break less often, mine faster, and/or do more damage in combat, depending on the tool.
Helve Hammer
The Helve Hammer is a device that can automate many anvil functions using mechanical energy.
To function, a helve hammer needs an anvil below its striking face. The Tier of the anvil will dictate how many blows is needed. To add items to a helve hammer simply throw them on top of the anvil with Q. Items may be extracted automatically by adding funnels to the hammer head block.
Helve hammer with anvil.
It is recommened to make two helve hammers and chain them together to automatically process Blooms and Steel.
Anvil Helper Guide
Working in Anvils is a key process inside TerraFirmaGreg, as most of your work towards the Steam and Mechanical ages will require the usage of an Anvil.
This guide is broken down into two parts, Understanding the UI and How to Perfectly Forge.
The Modpack has a custom Resource Pack called TFC Anvil Helper that you need to enable for this guide to make sense.
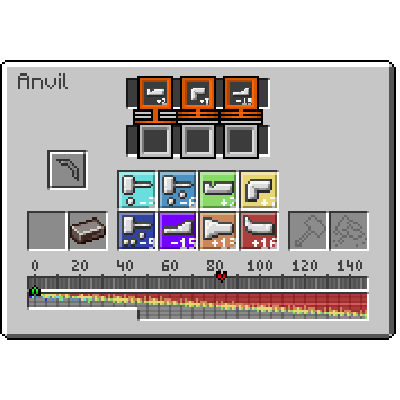
Пользовательский интерфейс с включенным TFC Anvil Helper
Интерфейс и ты
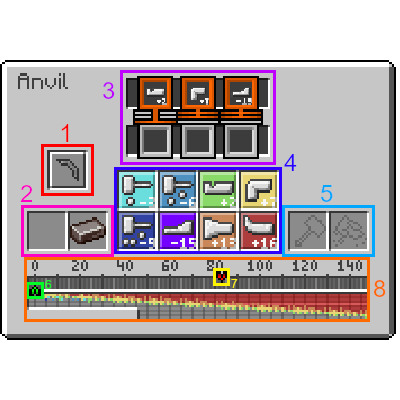
Пользовательский интерфейс наковальни с TFC Anvil Helper Enabled имеет цветные обозначения.
1. Предмет, который вы выбрали для создания на наковальне. Для каждого предмета требуется определенный набор шагов и требуемой работы
2. Элемент ввода, с которым вы сейчас работаете.
3. Необходимые этапы, которые должны быть выполнены до того, как изделие будет считаться готовым. Всего существует 4 различных варианта выполнения заказа (см. следующую страницу):
(Примечание: X — это подстановочный знак для любого типа шага.)
- x_Любой: Этот шаг может произойти в любом из последних трех действий.
- x_Последний: Это должен быть последний выполненный шаг.
- x_Не последний: Этот шаг не может быть последним выполненным шагом.
- x_Пред последний: Это должен быть предпоследний выполненный шаг.
- x_Третий последний:Это должен быть предпоследний выполненный шаг
4. Типы шагов. Каждый тип шага вычитает или прибавляет к текущему значению работы. Они расположены в порядке слева направо, сверху вниз:
- Слабо ударить: -3
- Ударить: -6
- Штамповать: +2
- Изогнуть: +7
- Сильно ударить: -9
- Протянуть: -15
- Обжать: +13
- Усадить: +16
5. The Slots where your Hammer goes, and Flux if you're Welding.
6. The current Work amount the item has, Doing different Steps either Increases or Decreases the amount of Work the item has.
7. The Target Work value, the Work value must be aligned EXACTLY with the Target Work, AND the Required Steps must be fulfilled for the Item to be considered complete.
8. The Work Bar, used for Aligning the Work value with the Target Work value.
Как идеально выковать
Perfectly Forging an Item which can break, such as Tool Heads, Weapons, and Armor causes the Item to gain bonuses to its durability and general efficiency with the less total steps you take to forge the Item. Completing the Work on an Item with very few steps causes it to be Perfectly Forged, not only giving your finished item bonuses, but also reducing the overall wear and tear to the Hammer.
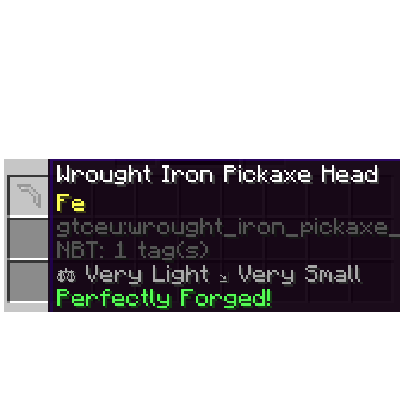
Идеально выкованная головка кирки из кованого железа
Руководство по ковке
This part of the guide will cover how to Perfectly Forge anything, starting with a Wrought Iron Pickaxe Head.
DISCLAIMER:
While the Required Steps and Orders for an Item are universal within all worlds in TFG, the Target Work value differs because it's derived from your world's Seed, as such, this Guide ASSUMES the Target Work value for the Wrought Iron Pickaxe Head is 83.
Шаг 1
The first Step in your Forging Journey is to get the Value taken by Adding all the Required Step's values together. For a Pickaxe Head, you need the following Steps:
- Punch Last
- Bend Not Last
- Draw Not Last.
By adding the Values on the Bottom of each Step, We get the Value we're looking for. Let's call this value "requiredWork".
2 + 7 + (-15) = -6
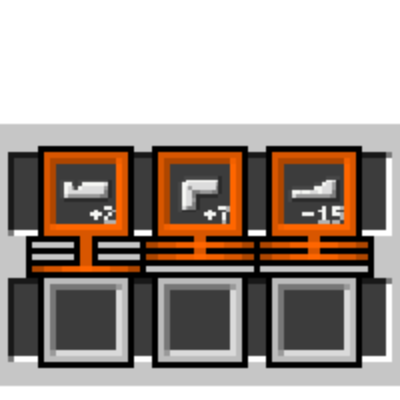
Этапы изготовления кирки
Шаг 2
While our main goal for the Work Amount is to align it with the Target Work, we need to make sure both that requirement AND the Steps requirements are fulfilled, as such, directly aligning the Work Amount with the Target Work will not yield desirable results. Instead, we can calculate the value derived from Target Work and "requiredWork"
Это значение можно получить в зависимости от "НеобходимаяРабота" (т.е.: если значение отрицательное или положительное).
- Если "НеобходимаяРабота" положительное
- Вычти "НеобходимаяРабота" абсолютное значение от "Целевой работы"
- 83 - 6 == 77
- Если "НеобходимаяРабота" отрицательное
- Добавь "НеобходимаяРабота" абсолютное значение из "Целевой работы"
- 83 + 6 = 89
Так как "НеобходимаяРабота" для нашего предмета равно -6, искомое нами значение — это 89.
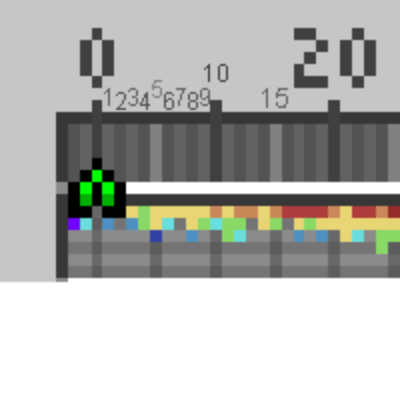
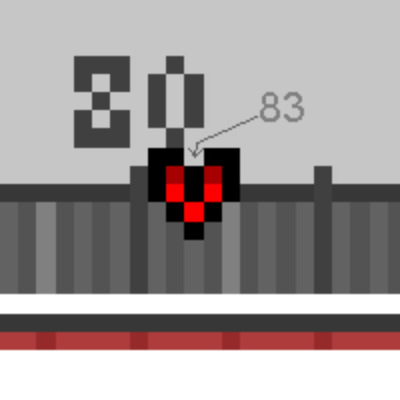
Возможно, вас интересует, как получить точные числовые значения для вашей Целевой работы? В пользовательском интерфейсе наковальни это отображается на панели задач. Она показывает только числа, кратные 20, но другие числа легко узнать по цветным линиям:
- Светло-серый: Представляет собой кратное 5
- Серый: Представляет собой нечётное число
- Темно-серый: Представляет собой четное число
Шаг 3
С учетом значения, полученного из "Целевой работы" и "НеобходимаяРабота", теперь нам нужно достичь указанного значения объема работы. Это можно сделать либо вручную, сложив числа, указанные для каждого шага, либо используя шпаргалку на панели интерфейса. Каждый цвет обозначает тип шага в пользовательском интерфейсе.
Т.е.: Красный == Усадить (+16)
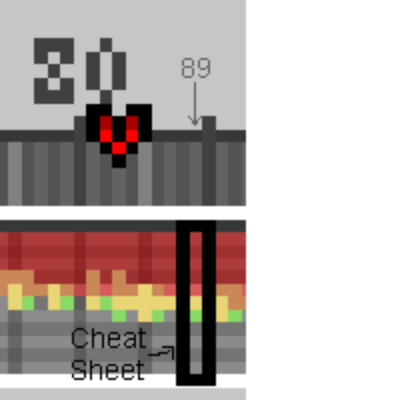
16 + 16 + 16 + 16 + 16 + 7 + 2 = 89
Шаг 4
Now that we know the required steps, it's time to reach the Value derived from "Target Work" and "requiredWork". For a pickaxe head where it's TotalWork value is 83, we need to reach 89. As such, we do: (Shrink x 5) → Bend → Punch.
Once our Work value is at our desired value, just follow the Required Steps, which for a pickaxe head its: Draw → Bend → Punch. And Voilà! We've obtained a Perfectly Forged Item!
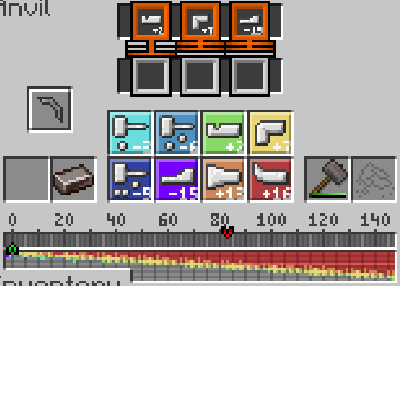
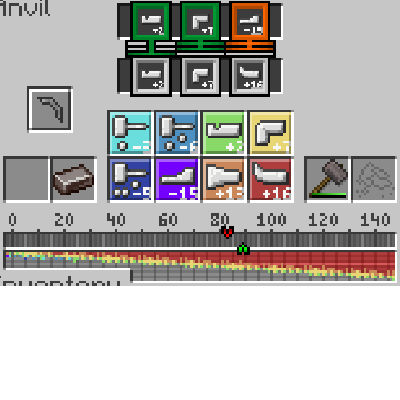
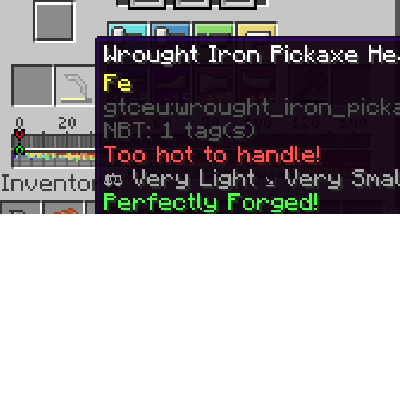
An Ingot with No Work → Desired Work Value Reached → Doing the Required Steps for our Item.
Примеры
Lets see this process with other items, such as a Plate, or a Rod. Again, the Target Work differs by the world seed, so their values will be different on your world.
Plate Target Value: 111
Required Steps: Hit x 3, Any Order.
"requiredWork": -3 x 3 = -9
Derived Value: 111 + 9 = 120.
Reaching the Value: (Shrink x 5) → (Upset x 2) → (Punch x 2)
Getting the Item: 120 - (Light Hit x 3) == 111. Both requirements met.
Rod Target Value: 78
Required Steps: Draw → Draw → Bend
"requiredWork": (-15 x 2) + 7 = -23
Derived Value: 78 + 23 = 101.
Reaching the Value: (Shrink x 5) → (Bend x 3)
Getting the Item: 101 - 15 - 15 + 7 = 78.
Другие интересные факты
Если один из Необходимых шагов пуст, Это означает, что любой из шагов может быть использован.
Если ваши расчеты не верны, вы всегда можете переплавить и отлить изделие обратно в слиток, это удалит тег "worked" на предмете, позволяя вам попробовать еще раз, чтобы идеально его выковать.
Congratulations on reaching the end! If you want to follow along in a creative world, the seed used during its writing is -7291708953208913102.
Comments