Anvils
- Stone Anvils
- Obtaining Raw Rock
- Welding
- Metal Anvils
- Tiers
- Working Metal
- Forging Bonuses
- Helve Hammer
- Anvil Helper Guide
Introduction
An alternative to casting tools directly (and a requirement for higher tier metals) is to use an Anvil. An anvil is a block which can be used for two different processes: Working and Welding. An anvil can weld double ingots of the metal type needed to create the next tier anvil above it, which will be necessary to work other items from that metal.
Stone Anvil
First, you need to acquire a block of raw igneous rock, that is igneous extrusive (Rhyolite, Basalt, Andesite, or Dacite) or igneous intrusive (Granite, Diorite, Gabbro, Pyroxenite, or Keratophyre). You could find and use an exposed block in the world, or you could extract one from the surrounding rock.
You will also need any kind of hammer. In order to make the anvil, simply Right Click the exposed top face of a raw rock block with your hammer, and voilà! An anvil will be formed.
Anvils have tiers and the rock anvil is tier 0 - the lowest tier. It is only able to Weld tier I ingots.
中央の石を金床に加工します。
石の回収
In order to obtain a raw rock block without breaking it into smaller rocks, it needs to be extracted. You must mine the blocks on all six sides of a raw rock block. Once it is surrounded by air on all sides it will pop off as an item which can be picked up.
石の周囲6面を全て採掘しましょう。完了すると中央の石ブロックがアイテムとしてドロップします。
Welding
Welding is a process through which two items are fused together to create a new item. Welding works the same whether on a Stone Anvil or a Metal Anvil.
First, you must place the two items you want to weld on the anvil by opening the anvil interface and inserting them in the two leftmost slots.
You also need to have at least one Flux in the anvil to aid the welding process. Then, while both items are hot enough to weld (the tooltip will say "Can Weld") you must use any hammer on the anvil or press the weld button on the anvil interface. You will hear a hammering sound and the items will be welded together.
Metal Anvils
Metal anvils are an important tool required for metalworking, as they allow you to work and weld metal ingots into various different forms.
Working is done to form one piece of metal into another, and welding, is used to fuse two metal items into one solid piece.
全種類の金床
Anvils can be crafted with Double Ingots of their respective metal. For your first anvil, you must first Weld double ingots on a Stone Anvil. Anvils are very heavy, you can only carry one at a time.
金床にはそれぞれ等級があり、その金床で扱える金属の種類は金床の等級によって決まります。金床は同じ等級の金属を鍛造することができ、1段階上の等級の金属を溶接することができます。
- 等級0: 石の金床
- 等級1: 銅
- 等級2: 蒼鉛青銅・黒青銅・青銅
- 等級3: 錬鉄
- 等級4: 鋼鉄
- 等級5: 黒鋼
- 等級6: 赤鋼・青鋼
Working
In order to work an item on the anvil, you will need to Right Click the anvil, to open up the anvil interface, seen on the next image. On the left, there are two input slots for items - for working, the target item must be in the right-hand slot. You will also need a hammer while working, either in the hammer slot on the right of the anvil or in your main hand. The hammer will gradually take damage as you work the item.
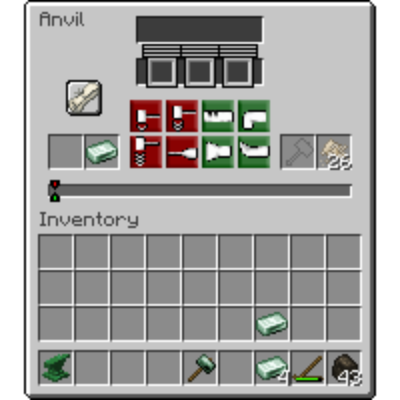
金床GUI
You will then need to select the plan, which chooses which item you want to create. Left Click on the scroll button, and then pick one of the items to create. The anvil interface will return, but now you will have selected a plan. The scroll will show the item you are working to create, and the rules and target will now be populated.
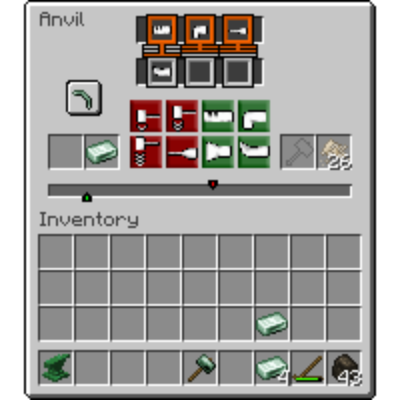
ピッケルの作成を選択した画面。
ターゲット
金床GUIの下部中央には、2色のインジケーターが付いたメーターがあります。緑矢印は現在の作業の進行状況で、赤矢印がターゲットを示しています。この2つをぴったり重ねるのが目標です。
そのために、緑と赤のアクションボタンを使って進行状況を調整します。選んだアクションによって、進行度が決まった量だけ動きます。
Green actions will always move your target right, and Red actions will always move your progress left. Note that if you move your target off of the progress bar, you will have overworked your item and will lose the ingot. However, while working, you must also match the rules...
鍛造におけるルール
ルールとは、金床画面の上部に表示される2~3個のアイコンです。これは、鍛造を成功させアイテムの作成を完了させるための条件を示しています。つまり、鍛造を完了するためには上に指定された順番でアクションを行うことにより緑と赤の矢印を一致させる必要があるということです。例えばルールで「曲げる:最後から2番目に」と指定されていた場合は、最後から2番目のアクションは「曲げる」でなければならないという意味です。
Your last three actions are shown right underneath the rules. When a rule is satisfied, its outline will change to green. Success occurs when all rules are satisfied.
Finally, you have to be mindful of your item's temperature. Metals can only be worked when they are above a certain temperature where the tooltip shows "Can Work". You may take an item out and re-heat it during the working process.
Confused? That's ok, it's a lot to take in, but it's actually just a simple bit of addition and subtraction. Check our step-by-step guide on how to use the "anvil helper" resource pack, which makes smithing easy!
鍛造ボーナス
Working can be tedious, and take many steps to get correct. However, there is a reward for being efficient. Some items―such as tool heads―when they are worked in a low or minimal amount of steps, receive a Forging Bonus based on how efficiently they were forged. This bonus will then apply to tools that the item is used in, for example, a pickaxe head used to make a pickaxe.
We also have a step-by-step guide on how to perfectly forge anything!
完璧な鍛造
There are four tiers of forging bonus:
- Modestly Forged
- Well Forged
- Expertly Forged
- Perfectly Forged
These bonuses increase the power of your tool - making it break less often, mine faster, and/or do more damage in combat, depending on the tool.
Helve Hammer
The Helve Hammer is a device that can automate many anvil functions using mechanical energy.
To function, a helve hammer needs an anvil below its striking face. The Tier of the anvil will dictate how many blows is needed. To add items to a helve hammer simply throw them on top of the anvil with Q. Items may be extracted automatically by adding funnels to the hammer head block.
Helve hammer with anvil.
It is recommened to make two helve hammers and chain them together to automatically process Blooms and Steel.
Anvil Helper Guide
Working in Anvils is a key process inside TerraFirmaGreg, as most of your work towards the Steam and Mechanical ages will require the usage of an Anvil.
This guide is broken down into two parts, Understanding the UI and How to Perfectly Forge.
The Modpack has a custom Resource Pack called TFC Anvil Helper that you need to enable for this guide to make sense.
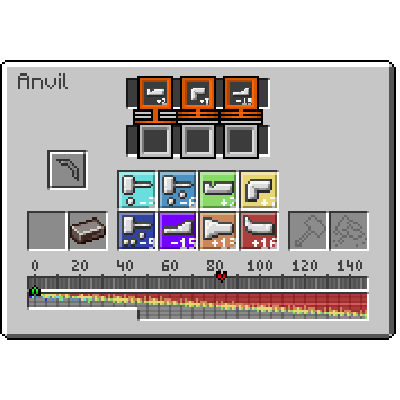
TFC Anvil Helperを有効化した状態での金床UI
UIとあなた
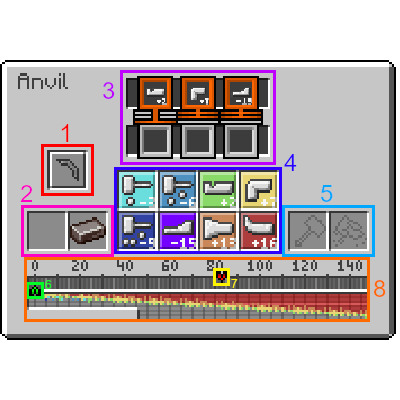
各表示の詳細
1. 金床で作成対象として選択しているアイテムです。各アイテムには、それぞれ固有の工程と作業量が設定されています。
2. 現在加工中の素材です。
3. アイテムを完成させるための、決められた工程です。工程実行順番は全部で4種類あります(次のページを参照してください)。
(注:X は任意の工程を表します)
- X_いつでも:その工程は直近3回の行動のどこに入っていても構いません。
- X_最後に:その工程を最後に実行しなければなりません。
- X_最後以外に:その工程を最後に実行してはいけません。
- X_最後から2番目に:その工程を最後から2番目に実行しなければなりません。
- X_最後から3番目に:その工程を最後から3番目に実行しなければなりません。
4. 工程の種類です。各工程は現在の進行度を減算または加算します。左から右、上から下の順に次の通りです。
- 軽く打つ:-3
- 普通に打つ:-6
- 穴をあける:+2
- 曲げる:+7
- 強く打つ:-9
- 引き延ばす:-15
- 短くする:+13
- 縮める:+16
5. The Slots where your Hammer goes, and Flux if you're Welding.
6. The current Work amount the item has, Doing different Steps either Increases or Decreases the amount of Work the item has.
7. The Target Work value, the Work value must be aligned EXACTLY with the Target Work, AND the Required Steps must be fulfilled for the Item to be considered complete.
8. The Work Bar, used for Aligning the Work value with the Target Work value.
完璧な鍛造への道
Perfectly Forging an Item which can break, such as Tool Heads, Weapons, and Armor causes the Item to gain bonuses to its durability and general efficiency with the less total steps you take to forge the Item. Completing the Work on an Item with very few steps causes it to be Perfectly Forged, not only giving your finished item bonuses, but also reducing the overall wear and tear to the Hammer.
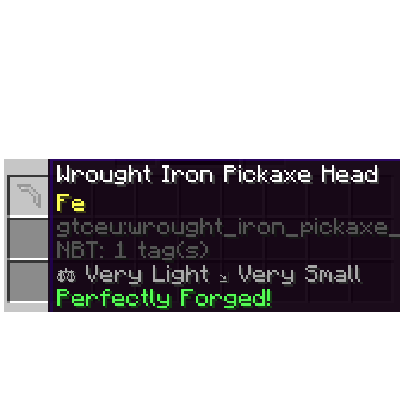
完璧な鍛造の錬鉄のツルハシの頭
鍛造ガイド
This part of the guide will cover how to Perfectly Forge anything, starting with a Wrought Iron Pickaxe Head.
DISCLAIMER:
While the Required Steps and Orders for an Item are universal within all worlds in TFG, the Target Work value differs because it's derived from your world's Seed, as such, this Guide ASSUMES the Target Work value for the Wrought Iron Pickaxe Head is 83.
ステップ 1
The first Step in your Forging Journey is to get the Value taken by Adding all the Required Step's values together. For a Pickaxe Head, you need the following Steps:
- Punch Last
- Bend Not Last
- Draw Not Last.
By adding the Values on the Bottom of each Step, We get the Value we're looking for. Let's call this value "requiredWork".
2 + 7 + (-15) = -6
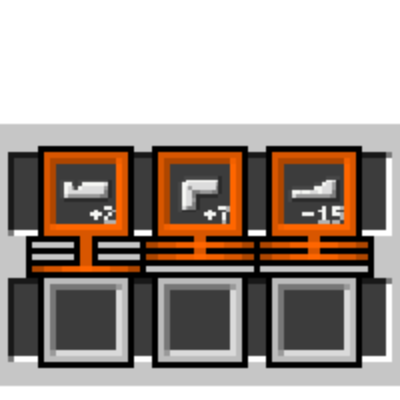
この工程はツルハシの頭のものです
ステップ2
While our main goal for the Work Amount is to align it with the Target Work, we need to make sure both that requirement AND the Steps requirements are fulfilled, as such, directly aligning the Work Amount with the Target Work will not yield desirable results. Instead, we can calculate the value derived from Target Work and "requiredWork"
この値は、「必要工程値」が正か負かによって求め方が変わります。
- 「必要工程値」が正の場合
- 「必要工程値」の絶対値を「目標進行度」から引きます。
- 83 - 6 = 77
- 「必要工程値」が負の場合
- 「必要工程値」の絶対値を「目標進行度」に足します。
- 83 + 6 = 89
今回のアイテムの「必要工程値」は -6 なので、求めるべき値は89です。
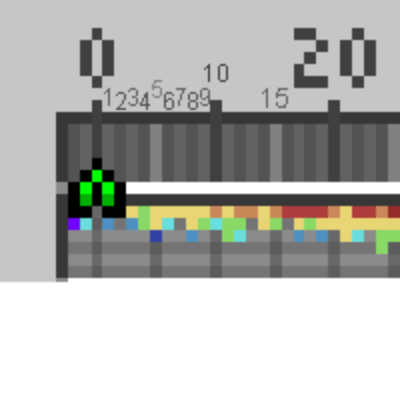
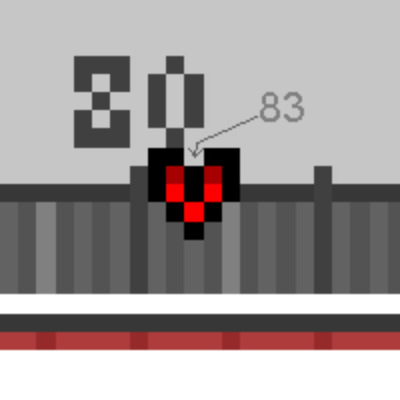
「目標進行度の正確な数値はどうやって確認するのか?」と思われるかもしれません。目標進行度は金床の進行度バーから読み取れます。進行度バーには20刻みの数値しか表示されませんが、色分けされた目盛りを利用することで、その間の数値も簡単に読み取れます。
- 薄い灰色:5の倍数を表します。
- 灰色:奇数を表します。
- 濃い灰色:偶数を表します。
ステップ 3
「目標進行度」と「必要工程値」から求めた値が分かったら、次は実際にその進行度へ到達する必要があります。これを行う方法は、各工程に対応する数値を自分で計算しながら進める方法と、進行度バーの下のチートシートを利用する方法の2つがあります。各色は工程の種類に対応しています。
例えば、赤色は「縮める(+16)」を表します。
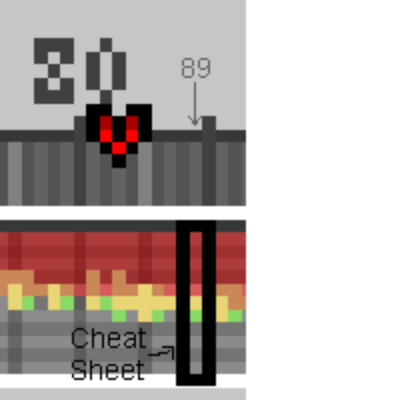
16 + 16 + 16 + 16 + 16 + 7 + 2 = 89
ステップ4
Now that we know the required steps, it's time to reach the Value derived from "Target Work" and "requiredWork". For a pickaxe head where it's TotalWork value is 83, we need to reach 89. As such, we do: (Shrink x 5) → Bend → Punch.
Once our Work value is at our desired value, just follow the Required Steps, which for a pickaxe head its: Draw → Bend → Punch. And Voilà! We've obtained a Perfectly Forged Item!
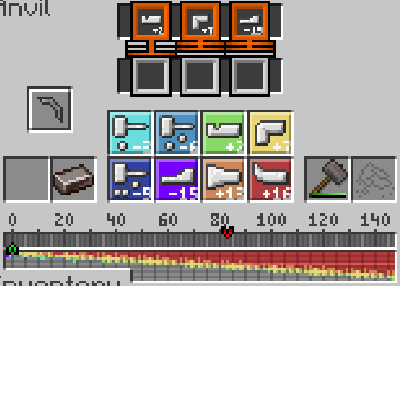
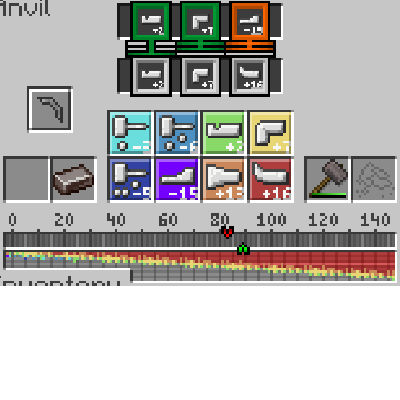
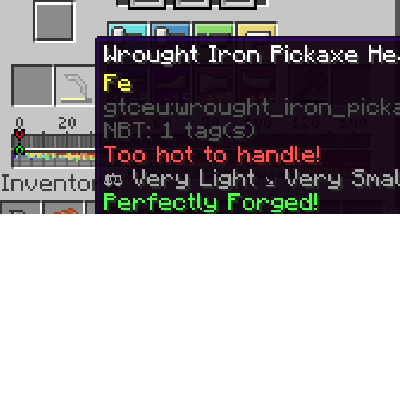
An Ingot with No Work → Desired Work Value Reached → Doing the Required Steps for our Item.
その他の例
Lets see this process with other items, such as a Plate, or a Rod. Again, the Target Work differs by the world seed, so their values will be different on your world.
Plate Target Value: 111
Required Steps: Hit x 3, Any Order.
"requiredWork": -3 x 3 = -9
Derived Value: 111 + 9 = 120.
Reaching the Value: (Shrink x 5) → (Upset x 2) → (Punch x 2)
Getting the Item: 120 - (Light Hit x 3) == 111. Both requirements met.
Rod Target Value: 78
Required Steps: Draw → Draw → Bend
"requiredWork": (-15 x 2) + 7 = -23
Derived Value: 78 + 23 = 101.
Reaching the Value: (Shrink x 5) → (Bend x 3)
Getting the Item: 101 - 15 - 15 + 7 = 78.
補足
必要工程の中に空欄がある場合、その枠はなんでもありです。どの工程であっても条件を満たせます。
もし計算を間違えてしまっても心配はいりません。アイテムを溶かして再びインゴットとして鋳造すれば、「鍛造途中」状態がリセットされます。これにより、完璧な鍛造に再挑戦できます。
Congratulations on reaching the end! If you want to follow along in a creative world, the seed used during its writing is -7291708953208913102.
Comments