Kowadła
- Stone Anvils
- Obtaining Raw Rock
- Welding
- Metal Anvils
- Tiers
- Working Metal
- Forging Bonuses
- Helve Hammer
- Anvil Helper Guide
Wprowadzenie
An alternative to casting tools directly (and a requirement for higher tier metals) is to use an Anvil. An anvil is a block which can be used for two different processes: Working and Welding. An anvil can weld double ingots of the metal type needed to create the next tier anvil above it, which will be necessary to work other items from that metal.
Kamienne kowadło
First, you need to acquire a block of raw igneous rock, that is igneous extrusive (Rhyolite, Basalt, Andesite, or Dacite) or igneous intrusive (Granite, Diorite, Gabbro, Pyroxenite, or Keratophyre). You could find and use an exposed block in the world, or you could extract one from the surrounding rock.
You will also need any kind of hammer. In order to make the anvil, simply Right Click the exposed top face of a raw rock block with your hammer, and voilà! An anvil will be formed.
Anvils have tiers and the rock anvil is tier 0 - the lowest tier. It is only able to Weld tier I ingots.
Zamienianie surowej skały na kowadło.
Otrzymywanie surowych skał
In order to obtain a raw rock block without breaking it into smaller rocks, it needs to be extracted. You must mine the blocks on all six sides of a raw rock block. Once it is surrounded by air on all sides it will pop off as an item which can be picked up.
Należy odsłonić wszystkie sześć ścian bloku surowej skały - wtedy środkowy blok wypadnie jako przedmiot.
Spawanie
Welding is a process through which two items are fused together to create a new item. Welding works the same whether on a Stone Anvil or a Metal Anvil.
First, you must place the two items you want to weld on the anvil by opening the anvil interface and inserting them in the two leftmost slots.
You also need to have at least one Flux in the anvil to aid the welding process. Then, while both items are hot enough to weld (the tooltip will say "Can Weld") you must use any hammer on the anvil or press the weld button on the anvil interface. You will hear a hammering sound and the items will be welded together.
Metalowe kowadła
Metal anvils are an important tool required for metalworking, as they allow you to work and weld metal ingots into various different forms.
Working is done to form one piece of metal into another, and welding, is used to fuse two metal items into one solid piece.
Wszystkie metalowe kowadła.
Anvils can be crafted with Double Ingots of their respective metal. For your first anvil, you must first Weld double ingots on a Stone Anvil. Anvils are very heavy, you can only carry one at a time.
Każde kowadło posiada swój poziom, który określa, jakie materiały mogą być na nim wykuwane i spawane. Kowadła umożliwiają kucie materiałów o takim samym poziomie oraz spawanie materiałów o jedną rangę wyższych.
- Poziom 0: Kamienne kowadło
- Poziom I: Miedź
- Poziom II: Brąz bizmutowy, Czarny brąz, Brąz
- Poziom III: Kute żelazo
- Poziom IV: Stal
- Poziom V: Czarna stal
- Poziom VI: Czerwona stal, Niebieska stal
Kucie
In order to work an item on the anvil, you will need to Right Click the anvil, to open up the anvil interface, seen on the next image. On the left, there are two input slots for items - for working, the target item must be in the right-hand slot. You will also need a hammer while working, either in the hammer slot on the right of the anvil or in your main hand. The hammer will gradually take damage as you work the item.
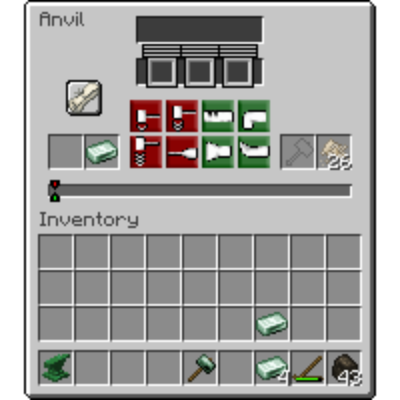
Interfejs kowadła.
You will then need to select the plan, which chooses which item you want to create. Left Click on the scroll button, and then pick one of the items to create. The anvil interface will return, but now you will have selected a plan. The scroll will show the item you are working to create, and the rules and target will now be populated.
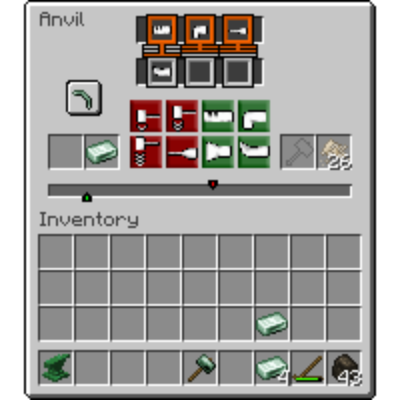
Interfejs po wybraniu opcji ostrza kilofa do wykucia.
Cele
Na środku widnieć będzie pasek z dwoma kolorowymi wskaźnikami. Zielony wskaźnik oznacza dotychczasowy postęp. Wskaźnik czerwony zaś oznacza cel do spełnienia. Zadaniem gracza jest zrównanie zielonego wskaźnika z czerwonym.
Aby to osiągnąć, należy wykorzystać zielone i czerwone przyciski operacji kuźniczych, które będą przesuwać dotychczasowy postęp o określoną wartość, zależnie od podjętej operacji.
Green actions will always move your target right, and Red actions will always move your progress left. Note that if you move your target off of the progress bar, you will have overworked your item and will lose the ingot. However, while working, you must also match the rules...
Zasady kucia
Warunki to dwie lub trzy ikony wyświetlone na górze interfejsu. Określają one konkretne operacje, które muszą zostać podjęte we wskazanym momencie i kolejności, aby wybrany przedmiot mógł zostać wytworzony. Przykładowym warunkiem jest "Wygnij jako przedostatni", co oznacza, że przedostatnią operacją, jaką podejmie gracz, musi być operacja gięcia.
Your last three actions are shown right underneath the rules. When a rule is satisfied, its outline will change to green. Success occurs when all rules are satisfied.
Finally, you have to be mindful of your item's temperature. Metals can only be worked when they are above a certain temperature where the tooltip shows "Can Work". You may take an item out and re-heat it during the working process.
Confused? That's ok, it's a lot to take in, but it's actually just a simple bit of addition and subtraction. Check our step-by-step guide on how to use the "anvil helper" resource pack, which makes smithing easy!
Bonusy
Working can be tedious, and take many steps to get correct. However, there is a reward for being efficient. Some items―such as tool heads―when they are worked in a low or minimal amount of steps, receive a Forging Bonus based on how efficiently they were forged. This bonus will then apply to tools that the item is used in, for example, a pickaxe head used to make a pickaxe.
We also have a step-by-step guide on how to perfectly forge anything!
Idealnie wykute
There are four tiers of forging bonus:
- Modestly Forged
- Well Forged
- Expertly Forged
- Perfectly Forged
These bonuses increase the power of your tool - making it break less often, mine faster, and/or do more damage in combat, depending on the tool.
Młot spadowy
The Helve Hammer is a device that can automate many anvil functions using mechanical energy.
To function, a helve hammer needs an anvil below its striking face. The Tier of the anvil will dictate how many blows is needed. To add items to a helve hammer simply throw them on top of the anvil with Q. Items may be extracted automatically by adding funnels to the hammer head block.
Młot spadowy z kowadłem
Zaleca się zbudować dwa młoty spadowe i połączyć je ze sobą, aby automatycznie przetwarzać surówki oraz stal.
Przewodnik po pracy na kowadle
Working in Anvils is a key process inside TerraFirmaGreg, as most of your work towards the Steam and Mechanical ages will require the usage of an Anvil.
This guide is broken down into two parts, Understanding the UI and How to Perfectly Forge.
The Modpack has a custom Resource Pack called TFC Anvil Helper that you need to enable for this guide to make sense.
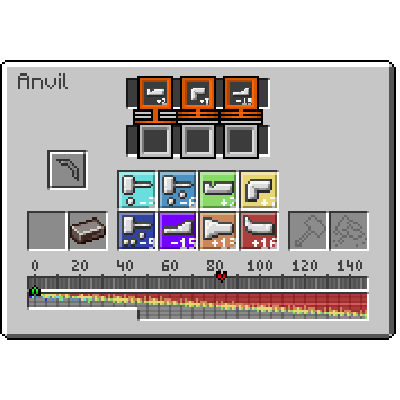
Interfejs kowadła z włączonym TFC Anvil Helper
Interfejs i Ty
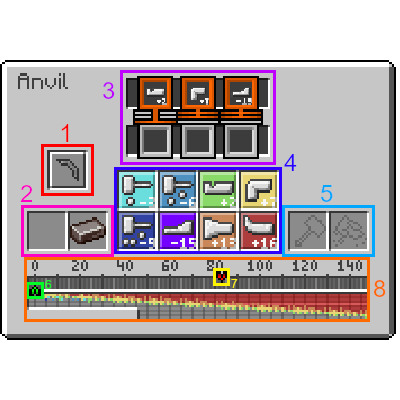
Interfejs kowadła z włączonym TFC Anvil Helper, z kolorowymi oznaczeniami.
1. The item you've selected to Create in the Anvil. Each item has a specific set of required Steps and Work Amount
2. The Input item you're currently working.
3. The required Steps in Order that must be completed before the Item is considered complete. There are a total of 4 different Orders (See next Page):
(Note: X is a wild-card for any kind of Step)
- x_Any: Step can occurr in any of the last 3 actions.
- x_Last: Must be the last step performed.
- x_Not Last: The Step cannot be the Last Step performed.
- x_Second Last: Must be the Second to Last step performed.
- x_Third Last: Must be the Third to Last step performed
4. The types of Steps. Each type of step Subtracts or Adds to the current Work value. These are, in order from Left to Right, Top to Bottom:
- Light Hit: -3
- Medium Hit: -6
- Punch: +2
- Bend: +7
- Hard Hit: -9
- Draw: -15
- Upset: +13
- Shrink: +16
5. The Slots where your Hammer goes, and Flux if you're Welding.
6. The current Work amount the item has, Doing different Steps either Increases or Decreases the amount of Work the item has.
7. The Target Work value, the Work value must be aligned EXACTLY with the Target Work, AND the Required Steps must be fulfilled for the Item to be considered complete.
8. The Work Bar, used for Aligning the Work value with the Target Work value.
Jak doskonale kuć
Perfectly Forging an Item which can break, such as Tool Heads, Weapons, and Armor causes the Item to gain bonuses to its durability and general efficiency with the less total steps you take to forge the Item. Completing the Work on an Item with very few steps causes it to be Perfectly Forged, not only giving your finished item bonuses, but also reducing the overall wear and tear to the Hammer.
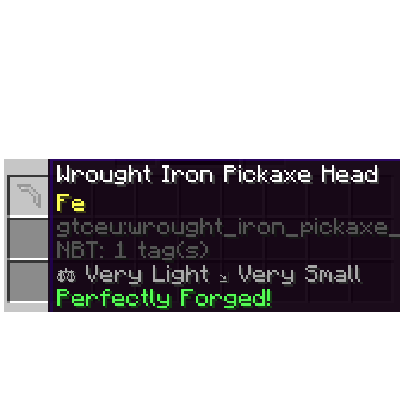
Idealnie wykute żelazne ostrze kilofa
Przewodnik po kuciu
W tej części przewodnika opisano, jak idealnie wykuć dowolny przedmiot, począwszy od ostrza kilofa z kutego żelaza.
DISCLAIMER:
While the Required Steps and Orders for an Item are universal within all worlds in TFG, the Target Work value differs because it's derived from your world's Seed, as such, this Guide ASSUMES the Target Work value for the Wrought Iron Pickaxe Head is 83.
Krok 1
The first Step in your Forging Journey is to get the Value taken by Adding all the Required Step's values together. For a Pickaxe Head, you need the following Steps:
- Punch Last
- Bend Not Last
- Draw Not Last.
By adding the Values on the Bottom of each Step, We get the Value we're looking for. Let's call this value "requiredWork".
2 + 7 + (-15) = -6
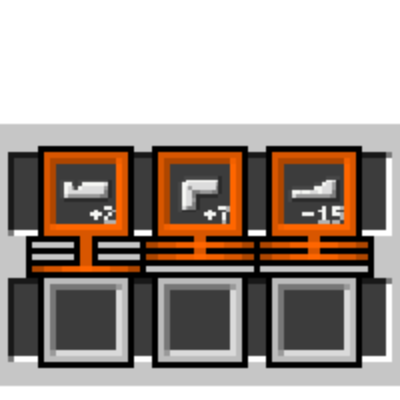
Kroki wymagane do kilofa
Krok 2
While our main goal for the Work Amount is to align it with the Target Work, we need to make sure both that requirement AND the Steps requirements are fulfilled, as such, directly aligning the Work Amount with the Target Work will not yield desirable results. Instead, we can calculate the value derived from Target Work and "requiredWork"
This value can be obtained depending on the Sign of "requiredWork" (IE: if the value is Negative or Positive).
- If "requiredWork" is Positive
- Subtract "requiredWork"'s Absolute Value from "Target Work"
- 83 - 6 == 77
- If "requiredWork" is Negative
- Add "requiredWork"'s Absolute Value to "Target Work"
- 83 + 6 = 89
Since the "requiredWork" for our item is -6, the value we're looking for is 89.
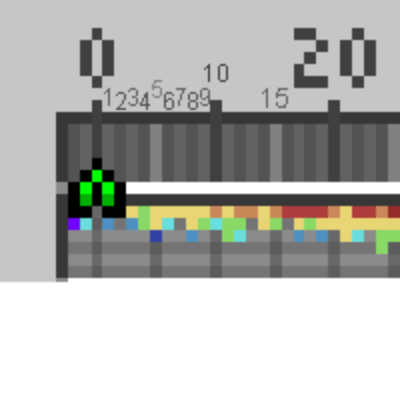
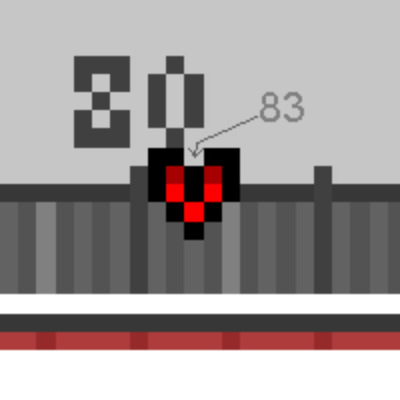
You may be wondering, how can you get exact numerical values for your Target Work? Well, the Anvil UI shows us with the Work Bar. It only shows the multiples of 20, but we can know the other numbers easily via the colored lines:
- Light Gray: Represents a multiple of 5
- Gray: Represents an Odd Number
- Dark Gray: Represents an Even Number
Krok 3
With the value derived from "Target Work" and "requiredWork", we now need to reach said Work value, this can be done either manually by adding the numbers attached for each step, or by using the cheat sheet in the UI bar. Each color represents the Step Type in the UI.
IE: Red == Shrink (+16)
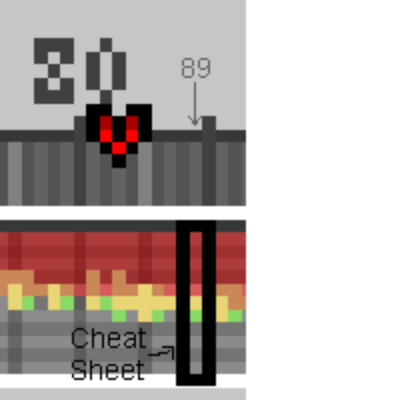
16 + 16 + 16 + 16 + 16 + 7 + 2 = 89
Krok 4
Now that we know the required steps, it's time to reach the Value derived from "Target Work" and "requiredWork". For a pickaxe head where it's TotalWork value is 83, we need to reach 89. As such, we do: (Shrink x 5) → Bend → Punch.
Once our Work value is at our desired value, just follow the Required Steps, which for a pickaxe head its: Draw → Bend → Punch. And Voilà! We've obtained a Perfectly Forged Item!
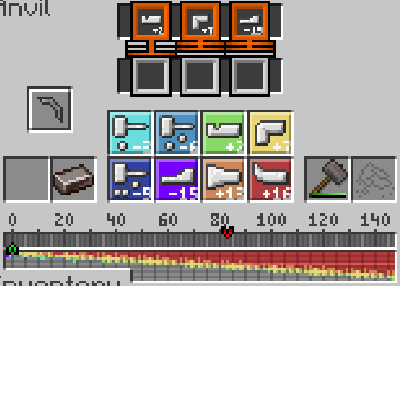
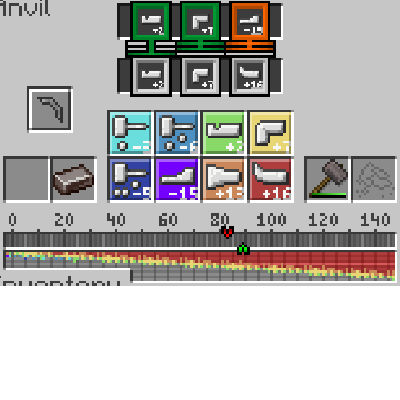
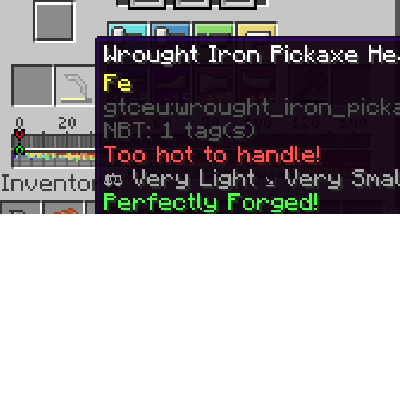
Nieobrobiona sztabka → Osiągnięcie docelowej wartości obróbki → Wykonanie czynności wymaganych dla danego przedmiotu.
Przykłady
Lets see this process with other items, such as a Plate, or a Rod. Again, the Target Work differs by the world seed, so their values will be different on your world.
Plate Target Value: 111
Required Steps: Hit x 3, Any Order.
"requiredWork": -3 x 3 = -9
Derived Value: 111 + 9 = 120.
Reaching the Value: (Shrink x 5) → (Upset x 2) → (Punch x 2)
Getting the Item: 120 - (Light Hit x 3) == 111. Both requirements met.
Rod Target Value: 78
Required Steps: Draw → Draw → Bend
"requiredWork": (-15 x 2) + 7 = -23
Derived Value: 78 + 23 = 101.
Reaching the Value: (Shrink x 5) → (Bend x 3)
Getting the Item: 101 - 15 - 15 + 7 = 78.
Dodatkowe informacje
If one of the Required Steps is Empty, it means it's a Wild Card, any Step can be used.
If you fail your calculations, you can always melt and cast your item back into an ingot, this will remove the "worked" tag for the item, letting you try again to perfectly forge it.
Congratulations on reaching the end! If you want to follow along in a creative world, the seed used during its writing is -7291708953208913102.
Comments