Metallurgy & Prospecting
- Surface Metal
- Extracting Metal
- Casting
- Alloying
- Utility Alloys
- Prospector's Pick
- Digital Prospecting
Scattered Metal
In addition to sticks, twigs, and stones on the ground, you may encounter small pieces of ores. These are important, as they are one of the few sources of ore and metal before obtaining a pickaxe. There are three types of these indicators:
- Mineral Dust
- Gem Buds
- Small Ores
Float Ore
When broken: dust indicators drop tiny piles of dust, gem buds drop chipped gems, and small ores give, well, small ores.
These indicator pieces can serve two purposes: they can provide a source of metal, and more importantly, they indicate the presence of a larger vein of ore somewhere below them. Be sure to note where indicators are on your map so you may return to excavate the vein later.
⚠ Be careful when picking up mineral dusts as some of them may be Hazardous, like Cobaltite or Galena for example.
Extraction
Ores yield a specific millibucket (mB) amount of actual metal which can be extracted through refining, melting, and casting. The amount obtained from an ore depends on the items "richness", chemical composition, and refinement.
Ore richness―from least to most rich―goes small, poor, normal, rich.
Some ores go by names you may be unfamiliar with. For example, if you are looking for copper you shouldn't just look for "copper ore". There are many different variates available. To understand what an ore piece will yield you can search its recipes in EMI, or look at its tooltip.
For example, searching EMI for "melts into Copper" will show every source of copper.
Understanding Ore
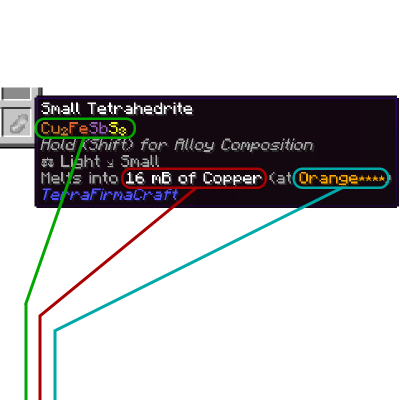
◼ - Chemical formula.
◼ - Metal yield when melted.
◼ - Melting temperature.
Casting
To begin casting your first metal you will use a Small Vessel. Place enough meltable ore inside of it to fill your desired Mold. For example, to make a saw blade you will need at least 144mB of metal.
You can view the amount of material in the vessel by looking at its tooltip.
Be aware that a vessel has a max fluid capacity of 3,024mB!
You can mix and match the types of ore inside a vessel, however all the ore must yield the same fluid metal, or you will create an Alloy.
Place your filled vessel into a Pit Kiln to melt its contents. Once finished you will have a brief window of time to cast, so keep an eye on your kiln!
Careful, the vessel will be hot! Craft Wooden Tongs with two sticks and a knife and hold them in your offhand to handle the hot vessel safely.
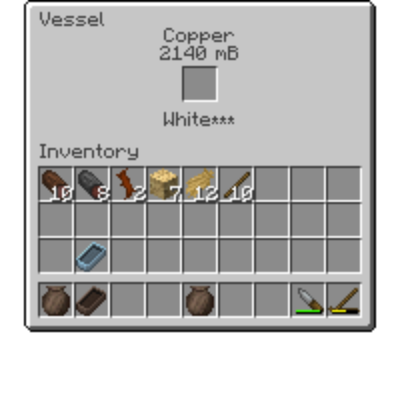
Kabı tut ve Döküm arayüzünü açmak için Right Click tuşuna bas.
With the casting interface open, place your empty fired mold in the center slot. It will fill up as long as the vessel remains liquid. (If the vessel solidifies, it can be reheated in another pit kiln.) Once the mold is full, it can be removed and left to cool. Once cool, the mold and its contents can be extracted by Right Click the mold, or putting it in the crafting grid.
You are now able to craft your first pickaxe! Find enough copper to make a pickaxe head, fire a pickaxe mold and melt the ore using a pit kiln, then cast a head. Slap it on a stick, and voilà! You can now dig for Ore.
Bakır Keski
A couple other important metal tools are available for progression as well. The Chisel is useful for working with stone blocks for building, and is required for other recipes.
item.gtceu.copper_saw
The saw allows you turn wood logs into support beams and lumber, which can further be crafted into planks, the crafting bench, barrels, and chests, among other things. It is also useful to make a canoe.
Alloying
Alloys are a method of mixing two or more metals together, to create a new, stronger metal. During the early game, while copper is a useful metal for creating tools, the next tier of metal is one of three types of Bronze. They are each slightly different in regard to durability, efficiency, and attack damage. An alloy is made up of component metals which must each satisfy a specific percentage of the overall whole.
One method through which alloys can be made during the early game is through the usage of a Small Vessel. The process is very similar to Casting. However, instead of using just a single metal, place enough ore pieces inside the vessel in the correct ratio to form a known alloy mix.
A vessel's tooltip will also tell you what its contents will alloy into, so you can use it to check your alloying ratios - no external calculator needed!
You can find alloy ratios by looking at their liquid alloying recipe in EMI. Alloys will accept a range of values, so percentages do not have to be perfect. For example, an idealized ratio for Bronze is 75% Copper, and 25% Tin, which means that for 144mB of Bronze you will need 108mB of Copper and 36mB of Tin.
If you can't find Tin, Black Bronze and Bismuth Bronze are also options! Tin is not required until steam machines.
Alloy Recipe
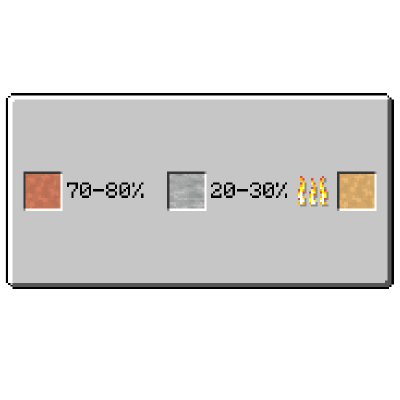
Example alloy recipe for bronze showing 70-80% Copper + 20-30% Tin = Bronze.
Yardımcı Alaşımlar
Yardımcı Alaşımlar
Yardımcı Alaşımlar
Yardımcı Alaşımlar
Yardımcı Alaşımlar
Yardımcı Alaşımlar
Yardımcı Alaşımlar
Yardımcı Alaşımlar
Many alloys are not suitable for creating tools but are still necessary for progression. Some of the most important utility alloys for early progression are Brass, Rose Gold, Sterling Silver, Tin Alloy, and Red Alloy.
Prospector's Pick
You remembered where you picked up those indicator ores, right? Finding additional ores may require extensive exploration and mining. You should become very familiar with Geology. If you need a specific resource, you must find the rock type it spawns in either under your feet or across the world.
Pro-Pick
If you're looking for ore veins, and you can't find the vein by guessing, it's time to pull out the prospector's pick. If you are familiar with base prospector's picks in TFC you may be suprised to learn that they function very differently in TerraFirmaGreg.
Right-clicking a prospector's pick in TFG will cast a search ray in your views' direction. The rays width and depth is dependent on the tier of the pick as noted in its tooltip. Depending on the tier, the prospector's pick can also give you a count of the ore quantities and even display an X-Ray indicator of the ore vein.
The prospector's pick can display the following information on use:
- In chat, the total quantity of the ore vein, the contents of the ore vein, and the quantity per ore-type of the ore vein.
- The colored steel prospector's picks can also display either a large X-Ray particle in the center of an ore vein, or paricles per ore block.
Prospector View
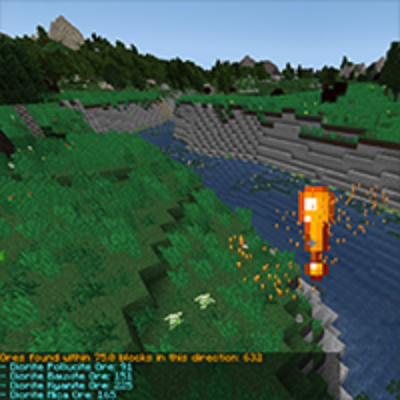
Colored steel pro-picks: The large ❗ is from per-vein style x-ray, and the smaller ones are from per-block style x-ray.
A prospector's pick head can be smithed on an Anvil or Cast, then affixed upon a stick like other tools.
Note: The majority of the stats and charecteristics of the prospector's picks can be adjusted in your server config file.
Digital Ore Prospectors
Digital Ore Prospectors
Digital Ore Prospectors
Technology is now! And with it comes new ways to find your ore veins!
Ore Prospectors are GregTech's solution to finding ore veins and fluid deposits in your world. The size and capabilities of the ore prospectors are determined by the voltage tier.
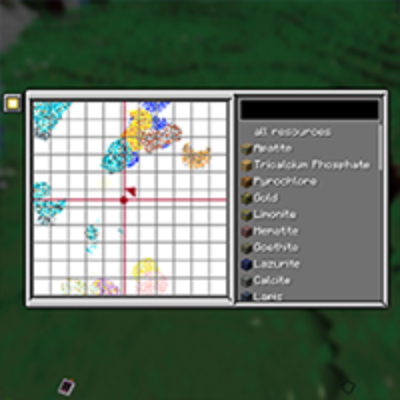
An example of what you may see using the LuV ore prospector. Keep your battery charged!
Comments